Flying and Photography


The world does look very different from the air. Aerial photography provides photographers often with a unique view of landscapes. This article is for you - the photographer to better assist you in getting that great shot from above.
Aircraft differences
For aerial photography we basically have two kinds of aircraft, fixed wing and rotors; i.e. airplanes and helicopters, with the latter being the more expensive option (we’re talking 3-6 times more expensive than planes). The helicopter can offer you very slow flight and even hovering (static) when you’re taking pictures, and the possibility of landing almost anywhere. Those options may well be worth the extra cost, depending on your budget and needs. Helicopters often have a door opening or a large window you can put your lens out of, offering an unobstructed view of the area below and directly out.
Airplanes on the other hand have fixed wings - not rotating. They’re generally either high-wing (like most single-engine Cessna’s) or low wing (like Piper Cherokee and many others). Generally, high-wing airplanes are considered better for aerial photography because the wing is located above you and hence out of the way when shooting downward. But then there are the turns, or bank as pilots like to refer to it. You might see something worth shooting and ask the pilot to make a slight turn around the area of interest, but then the wing gets in the way. Also, the wing struts (between the wing and the lower part of the fuselage) will be in your way at all times. Low-wing airplanes don‘t have any wing struts, so when taking a turn around a point, the view may well be unobstructed, depending on how sharp the turn is (more angle of bank).
A Cessna usually has a large window that can be fully opened in flight, but Pipers have a small opening in the window on the left side - beside the pilot‘s seat. That applies if you’re not in a Piper Saratoga where the cargo door can be removed. So if you‘re flying in a Piper, you would require a pilot that’s used to flying from the right seat. Most flight instructors are comfortable with that, but others may have an issue. If you’re opening the window, please note that you have to prepare for the oncoming wind when sticking your hand out to open or close the window. You know what I’m talking about if you’ve ever put your hand out of a car window at high speed.

You can work your way around the struts and the wing in most cases by pointing the lens forward and downward, or to the back of the strut (on most Cessna's).
Speed and wind velocity
We hardly ever fly at cruise speed when shooting, but most Cessna's and Pipers cruise at around 110-120 knots (200-220 km/hr) so relative wind velocity is high. It's still high when we're doing low speed flying. That’s why you don’t want your lens hood sticking out of the window in flight or even the strap. It may do some damage to the lens, camera and even the airplane if it rips off. If you’re using a zoom lens, chances are that the wind causes the lens to retract when subjected to the wind forces, so that’s another reason for not sticking the lens out.
Camera settings and shooting speed
As you won’t be doing a lot of close-range shooting, I’d recommend you use manual focus, set it to infinity ( ∞ ) and even tape the focus ring stuck so it doesn't move when the lens peeks out from the window.
Keep your shutter speed as high as possible – preferably over 1/500. Image stabilization lenses are great, but unnecessary if you stick to high shutter speeds. The best light is found early morning or just before the twilight's, so you might want to up your ISO setting in case the light is insufficient for high speeds.
Shooting through windows
Taking pictures through windows is less desirable, mainly because of scratches or contamination of the window and reflections. You may want to clean both sides of the window before the flight and bring a black towel or cloth with you. The cloth may be taped to the window and whenever you need to, you would cover the lens (not the optic of course) to minimize reflection. Some of my best pictures I’ve taken through windows, although some may have been better using the black-cloth technique.
Motion sickness
Looking into a viewfinder and then out the window, moving your head and changing focus may induce motion sickness. If you’re sensitive, you might want to take a motion sickness pills before your flight (Dramamine and Scopolamine may help) or just gnaw on some ginger. Make sure there are motion sickness bags (barf-bags) on-board and accessible to you. Get some fresh air blowing on you and even stop taking pictures for a while, until you recover.
If you feel nausea, please tell the pilot so he can make life a little easier on you and even make a short stop at an airfield close by. Helicopters are less susceptible to turbulence, so you’re in luck if choppers are within your budget.
The pilot’s job
Safety is the pilot’s number one priority. Arranging the plane to your preferences is secondary. You’d rather be alive than dead or mutilated with that special picture on your memory card. So, please respect the authority and skills of him as a pilot. I recommend that you talk to your pilot beforehand and find out the type of aircraft and even his personal qualifications before you fly. Make sure you have a common understanding of the mission and establish rules of communication with each other. Most airplanes have headsets with a microphone that turns on the intercom when spoken into. Pilots and passengers alike would appreciate if you’d move the mic out of the oncoming wind when you’re leaning into the window. That’s good etiquette.
Filters
If you already use a polarizing filter on your lens, leave it on, but don’t rush out to get one just for one flight. It may reduce haze and improve contrast - but perhaps nothing akin to what photo editing software does. Haze that forms because of airborne particles, which are more prominent after noon because of the earth lifting air upwards, and with it, dust. IR filters may come in handy in humid places. Oh, and by the way, a filter might take you down two f-stops that you can't afford to loose. Mkay?
Best time of day
Lighting is one of the most important factors in photography. The best lighting for aerial photography is early morning or late evening - most of the time. I prefer early morning or even at night here in Iceland, because of the 24 hour sunlight over the high summer. It‘s also less turbulence because of wind or thermal activity. Early morning in warmer countries is also preferable because the sun hasn't been up that long to warm up the earth‘s surface that in turns heats up the air and causes it to lift - resulting in buffeting (light to moderate turbulence) at lower altitudes.
Where the sun casts its shadows is another thing you have to be aware of. Waterfalls may be tricky to get a good picture of, especially ones that are located in tight valleys or canyons. The sun’s angle and lighting is always an issue, so I use www.suncalc.net for finding out the sun’s trajectory and times of daylight. Google Earth isn't quite there yet.
Equipment
Some photographers I fly with bring along their 70-300 mm lenses - and keep it in the back seat the whole time. The best lenses for aerial photography have usually been a 17-55 mm, 24-70 mm or even 35-135 mm. A bit of zoom range is good, but you‘ll hardly never use a large zoom, like 200 mm. or more. Good wide-angle lenses can get quite nice results, but call for a very high resolution if you're going to enjoy the picture to its fullest.
Cropped sensor or full frame? Well - don‘t go out buying your equipment for a single flight. Whatever you have and like is actually fine. I've actually used my iPhone 5 for some of the best shots I've got.

At last; dress for the occasion. Here in Iceland, it tends to get pretty cold, especially at altitude. Generally, by each 1000 feet, temperature drops by ca. 2° C. At 5000 feet, it’s 10° colder than at sea level. Use gloves and keep your coat on! Factor in the wind chill, and you’re experiencing coldness like never before.
Take care, have fun and safe flying!


其他有意思的博客

冰岛最浪漫的角落
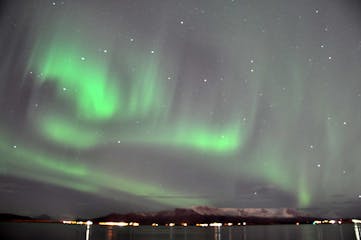
对于很多人,遥远的冰岛有着世界尽头的神秘,有着区别于巴黎、马尔代夫、自成一体的浪漫。没有埃菲尔铁塔和蒂凡尼,没有热带沙滩,而是在冰川、火山、苔藓地的背景下蜜月旅拍、婚拍,甚至举办一场冰岛婚礼。来冰岛旅行,多是要跨千山万水、飞跃大洋大陆,很有一点“万水千山陪你走过”的史诗感。难怪很多人说,光是冰岛二字,就足够浪漫了。 冰岛虽然不大,但是地貌极其丰富,不同的自然景观自然有不同的气质。这一篇,就挑阅读更多从极光观测到摄影-到底该不该来冰岛看极光
很多朋友都想来冰岛看极光,但是冰岛到底适不适合看极光呢?几月、什么季节能看到极光?是不是一定要参加北极光旅行团?如何能拍摄出美丽的极光照片呢?在冰岛住了好几年了,从刚开始逢极光必出门,到如今家里阳台就能看极光,我对在冰岛看极光的了解和经验,也算得上大半个专家了,且听我娓娓道来吧。 到底该不该来冰岛看极光呢?最坦诚的答案是,不要只为了看极光而看极光。 极光原理 太阳活动→太阅读更多
迷失冰岛的米湖游览推荐|不只有温泉的地热宝藏区
我在冬夏秋均到访过米湖,看过米湖的不同面。一直以来,米湖到底值不值得去是很多游客争论的问题。有些人觉得这里是来冰岛旅行的必去目的地,有些人则说米湖“太丑了”,连照片都不想多拍几张。那米湖到底值不值得来呢?到底怎么玩呢? 米湖的风景 北部的米湖,因地理位置相距首都雷克雅未克略远,很多来冰岛的短途游客选择放弃,其实米湖应该是和黄金圈、南岸沿线至冰湖齐名的冰岛景色,这里冷热相融,可谓最冰岛,尤其阅读更多


将冰岛最大的旅行平台下载到您的手机中,一站式管理您的整个行程
使用手机摄像头扫描此二维码,然后点击显示的链接,将冰岛最大的旅行平台添加到您的手机中。输入您的电话号码或电子邮件地址,以接收包含下载链接的短信或电子邮件。